Antique Jewelry Shows Fine Craftsmanship
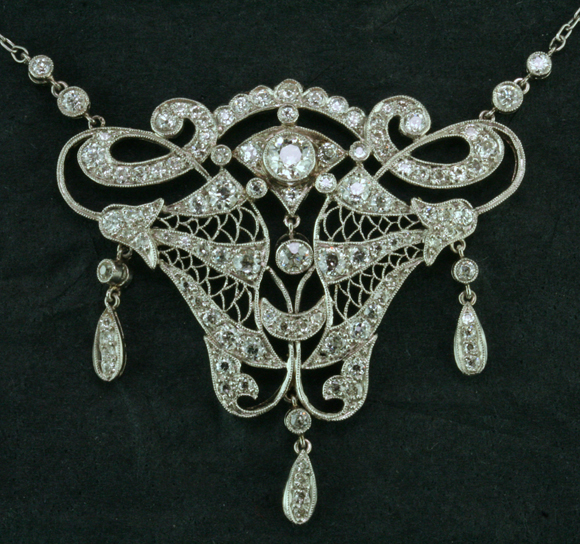
February 8th, 2014 by James L. Sweaney, CGA, FGA. GGThis exquisite necklace from the Edwardian period, circa 1900-1915, exhibits the fine craftsmanship we associate with antique jewelry. The piece was made by fabricating and forming raw metals into the parts of the jewel. The main body and dangles began as thin sheets of platinum. The chain and bezels were made from hand-drawn wires and tubing. Many steps and hours of effort were required to bring forth this dazzling work. This magnificent example of antique jewelry really deserves a close look!
Jewelers of the period were fine artists capable of precise life size drawings. This beautiful design has elements of the Art Nouveau style with flowing whiplash lines and floral elements, yet the effect is more formal and refined than Nouveau. An actual size drawing was done on paper, then transferred to the platinum sheet.
Using a classic technique known as piercing, the jeweler drilled small holes at the openings in the design, then carefully removed excess metal with a fine jeweler’s saw. Even the delicate crescent shapes flowing from the flowers were pierced– a less exacting method used in this period was to make the crescents from fine wires which were then soldered into the openings.
He constructed the three drop shapes from sheet and the round bezels from platinum tubes formed through a draw plate. The chain was assembled from tiny rings, soldered together one at a time. The five small bezels around the largest diamond were soldered into place.
Next, the jeweler shaped the piece using the chasing and repousse method. The work was placed on a surface of pitch that is firm but slightly yielding then worked with steel tools and a chasing hammer to push and “chase” the metal into the desired shape. The purpose was to add slight doming and subtle dimensions so the piece would be more dynamic.
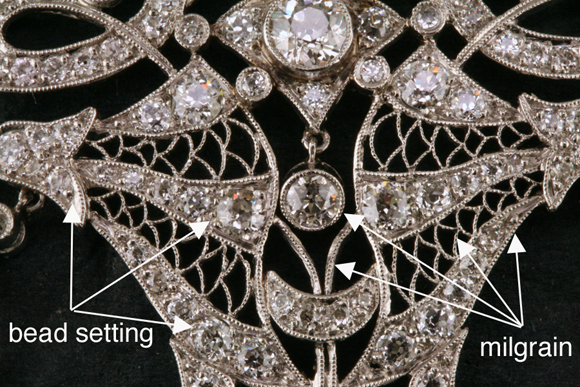
After piercing and shaping, the diamonds were set into the main portion of the work with the bead and bright cut method. A hole smaller than the diameter of the diamond was drilled through the platinum and a seat was cut to fit the bottom of each diamond. The actual setting is accomplished by small curls carved directly from the platinum which shaped into beads on the edges of the diamonds with a beading tool. Excess metal is carved away from the stones to create a reflective “picture frame” effect and to leave free standing beads
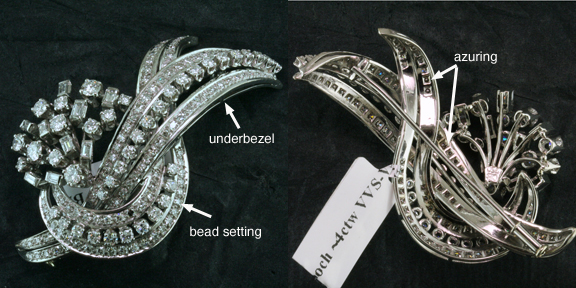
Before the actual setting, excess metal was also trimmed under each seat by a technique known as azuring. The purpose of azuring is twofold– it allows the backs of the diamond to be cleaned easily and makes the piece lighter in weight. Azuring requires great skill and is time consuming, so it’s only seen on the finest pieces. The rest of the diamonds were set into the bezels and drops.
After setting, the jeweler applied a decoration called milgraining along the edges and around the settings. Tiny beads are created by rolling a special knurled wheel along the edges of the design. During setting and milgraining, the work was supported on a shellac stick or on the same pitch used for the repousse.
The sawn surfaces of the openings in the design were painstakingly finished with a technique known as trumming. Strings or strips of cloth coated with polishing compounds were threaded into each opening and the piece would be moved back and forth along the taut strings until the surface was smooth and polished. Trumming a piece like this takes hours.
A rim of platinum known as the underbezel was fitted and soldered around the outer edge of the piece.The drops, bezels and chain were completed and attached. After the final polish and inspection, voila– a complete work of art!
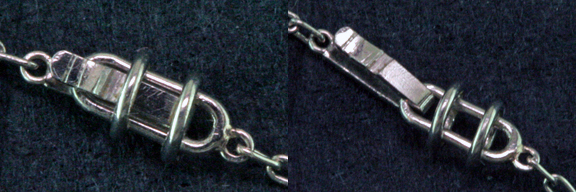
You can see how much time, patience and skill went into creating this piece. Even the smallest detail was important. As a jeweler, I was surprised and delighted by the elegance and simplicity of the safety clasp at the back of the chain– just three rings of platinum and a strip assembled into an effective fail-safe clasp.
These jewelry making techniques and methods have been developed over centuries and are timeless, passed on from jeweler to jeweler. This exuberant brooch from the 50’s was made in much the same way, fabricated from sheet and wire, diamonds bead set and azured. Notice how the backs of both pieces are as beautifully finished as the front.
Stop by the shop to see these antique and vintage jewels– we’ll be happy to discuss the methods used and explain the technology of the time. And remember, we’re always interested in buying antique and vintage pieces– we’ ll soon find a new home where they’ll be loved and cherished.
Tags: Antique Jewelry, Art Nouveau Jewelry, bead and bright cut, chasing, Edwardian jewelry, milgrain, piercing, platinum, repousse, trumming


